Three years ago today I posted the following on FB. His words resound all the more significantly today.
Today, two days prior to MLK’s birthday, his words still resonate, inspire, and instruct:
“Let us not seek to satisfy our thirst for freedom by drinking from the cup of bitterness and hatred. We must forever conduct our struggle on the high plane of dignity and discipline. We must not allow our creative protest to degenerate into physical violence. Again and again we must rise to the majestic heights of meeting physical force with soul force.
…Let us not wallow in the valley of despair. I say to you today, my friends, that in spite of the difficulties and frustrations of the moment, I still have a dream. It is a dream deeply rooted in the American dream.
I have a dream that one day this nation will rise up and live out the true meaning of its creed – we hold these truths to be self-evident: that all men are created equal.
I have a dream that one day on the red hills of Georgia the sons of former slaves and the sons of former slave-owners will be able to sit down together at a table of brotherhood.
I have a dream that one day even the state of Mississippi, a desert state, sweltering with the heat of injustice and oppression, will be transformed into an oasis of freedom and justice.
I have a dream that my four little children will one day live in a nation where they will not be judged by the color of their skin but by the content of their character. I have a dream today!
…With this faith we will be able to transform the jangling discords of our nation into a beautiful symphony of brotherhood…This will be the day, this will be the day when all of God’s children will be able to sing with a new meaning: ‘My country, ’tis of thee, sweet land of liberty, of thee I sing. Land where my fathers died, land of the pilgrim’s pride, from every mountainside, let freedom ring.’ And if America is to be a great nation, this must become true.”
(MMOTIRT = Making Music Online Together In Real Time)
tl;dr: A joyful musical reunion, technical challenges, and many lessons learned
Beloved musical friends connect for our first online string quartet
Yesterday I hosted my first over-the-internet string quartet with friends in Idaho, Oregon, and California. Several of us had not played our instruments in months and most had not played music with anyone else since February or March, 2020.
It was very emotional for us just to see and hear each other. Musicians live to play with each other and for an audience, and we haven’t been able to do that in at least 10 months. Jamkazam offers us the possibility of doing both, and we were eager to give it a try.
We had a lot of fun, and we learned a lot from this session:
Test your own configuration thoroughly to improve sound quality and remove noise
Know how to host private vs. public jam sessions
Know how to reconnect if you get dropped or Jamkazam quits
Thoroughly test and adjust session sound levels
The Jamkazam metronome
Video and recording can cause issues
Three of us had had one or two very brief Jamkazam sessions before, but none had attempted a jam session with this many folks at the same time. Here is a summary of our members’ location, equipment and network latencies:
Instrument
Location
Microphone
Latency
Violin
Idaho
Yeti Blue
7.8ms
Violin
Oregon
Schure with Yamaha AG06 mixer
8.4ms
Viola
California
Yeti Blue
10.8ms
Cello
Oregon
Yeti Blue
10.6ms
1. Sound issues At the very start, our violist reported hearing a slight echo on her own end. This was distracting and made it very difficult for us to play in time together.
As musicians, we are so used to using our ears to help us stay together that any latency or echo can really throw us off.
She experimented with plugging her headphones into her Yeti mic versus directly into her laptop. That change seemed to help.
Any changes to your mic and headphone setup requires you to leave your active session and reconfigure your audio gear. Then you have to be able to re-join the session (see 3 below).
Additionally, I was hearing some static and distortion over my headphones and sometimes when I was speaking or playing. The others could sometimes hear the static on their end.
Turning off my mic instantly cleared much of the noise for my friends. I need to look into my wiring and configuration to remove any sources of static and distortion.
A good idea is for each person to take turns turning off their mic. When they do, the others can listen to see if any background noise including hum or static goes away (Yeti Blue microphones have a mute button on their front which makes this easy to test). If so, the muted person has some homework to do to reduce and eliminate noise.
At one point when we were playing, we all heard a repeating note loud enough to distract us. It turned out it was my cell phone. It was on vibrate, and the alarm’s vibrations were transmitted from my desk up through the mic stand to my mic. So I will a) silence my phone, b) not place it on my desk, and c) reconfigure my mic stand.
Lesson 1: Thoroughly test your audio setup with a friend to minimize latency and optimize your sound quality.
2. Different types of sessions in Jamkazam
During our time together, we started with a Quick Start Friends session, which I’ve described in Part 4 of this series.
However, when we encountered some issues where people got disconnected, I decided to try a “Scheduled Future” session. That worked, but it apparently made our jam session public, because a random electric guitarist briefly joined us.
Lesson 2: I recommend only using Quick Start Friends for now
3. Reconnecting to a session
There were a couple times we had to reconnect to the session.
When trying to record inside Jamkazam, my application completely quit. Another time, our violist was testing changing her audio gear setup, which required her to leave our session.
For these reasons, know how to rejoin a session. It’s actually pretty easy:
a. From the Jamkazam home screen, click Find Session, and the Find a Session window will appear. In the lower half of the screen, you will see Sessions for Me. Your active session with your friends should be listed b. Click the Join or Rejoin button to the right to get reconnected
4. Thoroughly test and adjust session sound levels
Even if everyone diligently goes follows #1 above to reduce extraneous noise and optimize their own sound, in the group you may have to make adjustments so you can hear everyone. No one should be too soft to hear or too loud that they overpower everyone else.
If someone is too loud or too soft, their level can be adjusted either at their end or everyone else’s.
For example, three of us were using Yeti Blue microphones. This microphone has a gain dial on the back which can be turned up or down to adjust its sensitivity.
Yeti Blue microphone gain dial
I was not using a Yeti Blue mic, but my Yamaha AG06 mixer has a gain dial for my mic that accomplishes the same task.
Alternatively, in the Jamkazam session screen, you can adjust the level of each player. This will only impact what you hear, not what the others hear. a. Go to the Jamkazam session screen. If you have video running, you will need to minimize or move it to the side.
b. Locate the musician from the session screen whose sound level you want to adjust c. Click the speaker icon and a vertical volume level slider will appear. d. Adjust the slider up or down to make that musician’s sound level more in line with the group
5. The Jamkazam Metronome I was unfamiliar with this feature, and we tried it during our session. It helped a little bit in keeping us together, but there are far more features to the Jamkazam metronome which I learned this morning watching this video:
In short, the metronome can not only help you stay together, but it will give you an audio representation of how much latency there is across the group!
I definitely will be using the Jamkazam metronome in the future both to test latency and to improve our ability to play together.
6. Video and recording can cause issues
During our jam session, we naturally wanted to see each other.
On the Session screen, simply click Video in the top center, and a pop-up window will show you and everyone in your jam session.
We did have some issues where one person’s video just would not come up. We tried having her disconnect and reconnect, and finally gave up.
Also, people with Gold level accounts (your first month on Jamkazam gives you free Gold level access) have the option to record the Jamkazam session: a. click Record b. choose whether you want to record audio only, or audio and video c. choose whether you want to record your own webcam only, or the session
Naturally we wanted to record everything. However, we noticed sound quality quickly deteriorated – if we even were able to get that feature to work. I suspect the computing demand to both run the jam session and record pushed the boundaries of my MacBook Pro’s capabilities.
Lesson: Video and Recording may degrade your session. For best sound and reduced latency, you might not want to try to record everything unless you have an especially powerful computer. Also, consider disabling video altogether.
Summary: It was so much fun and very emotional for us to be able to play together. However, many moments felt and sounded like a junior high orchestra – pretty loosy-goosey and mediocre in terms of sound quality.
Patience is required since network hiccups, sudden computer crashes, and other technical issues may arise and need to be addressed. However, the joy of playing together far outweighed the struggles we initially encountered.
For those unfamiliar with this sacred choral work, may I recommend this Tallis Scholars video – and read wiki the incredible story of 14 y.o. Mozart’s transcribing it from from memory after one hearing.
I know this is a very long post, and those who are hesitant to give it a try may be further intimidated by reading the trials my friends and I are going through. However, I do encourage anyone with even a little interest in signing up and trying. The more people we have online, the quicker we can collectively overcome these obstacles and arrive at the place where we can easily find people with whom to joyously jam!
I will continue my testing and troubleshooting and am committed to making this smoother and easier for everyone.
Friends, please contact me if you are interested in trying this out!
After doing a lot of research, I settled on this device primarily for the “Loopback” setting, which allows you to mix audio from the computer into what you are recording/streaming without a feedback loop. This feature will be helpful for my online karaoke parties.
My other main hope was that this interface would help me reduce my latency using Jamkazam for online real-time musical collaboration. I had read good reviews of this interface, and positive ones specifically about using this one with Jamkazam.
I also hoped to significantly simplify my wiring setup, which is pretty complex and chaotic.
In previous tests the best latency figures I could get on either my Windows or Mac computers was just over 10ms (10.9ms), which Jamkazam rates as acceptable (yellow). I was hoping to get under 10ms.
Eagerly, I downloaded the latest drivers onto my Windows computer, connected everything up, launched Jamkazam…and my results were worse than before:
Initial testing with Windows resulted in unacceptable latency
I tried fiddling with various settings, but I never was able to get my latency down even into the yellow (10-20ms) range.
I then switched to my Mac, again downloading the drivers, connecting everything up, and…success! With just one or two tweaks, my latency was down to 8.41ms:
Latency results on my Mac were great!
I’m sure after doing further testing and troubleshooting I should be able to achieve successful results on my Windows computer. I’ll share my findings when I do.
Meanwhile, I am planning to attempt live string quartets with friends in Idaho, Oregon, and California this afternoon. I’ll report how that goes here soon!
tl;dr: Doubt in WhatsApp’s privacy and security increases with new privacy policy
WhatsApp is one of the more popular encrypted messaging apps in the world. It claims “end to end” (aka “e2e”) message encryption, and supports iOS, Android, Windows, and MacOS X 10.10.x and higher.
This week, WA announced it is changing its privacy policy, forcing users to allow data to be collected and shared including phone numbers, contacts’ phone numbers, locations, etc. If users don’t agree by the February 8, 2021 deadline, they will no longer be able to use WA.
WhatsApp notification of changes to its terms and privacy policy
I just got my first WA notification about the updated terms and privacy policy this morning.
Tesla CEO Elon Musk, no friend of Facebook, this morning tweeted: “Use Signal.”
WhatsApp and Facebook appear to be feeling the heat of the criticism aimed at the policy change. An updated message from Facebook claims it will continue to honor the opt out feature in WA even if you agree to the new policy. But how much can one trust Facebook to honor that commitment?
Galling to those in the U.S., WhatsApp reminds users there will be no change in data-sharing practices in the UK and EU, presumably as laws there are more restrictive about data-sharing than in the U.S.
What To Do?
Active users of Facebook and Facebook Messenger unconcerned about privacy need do nothing. If you use Facebook and FB Messenger and are concerned with privacy and were unaware of the issues, read on.
WhatsApp users, at least in the U.S., are probably a bit more concerned about privacy and advertising. They should should consider changing applications – or at least watch to see if WhatsApp changes its tune in the month leading up the February 8, 2021 deadline.
Even if WA does change its policy, one has to ask oneself how much they trust any product owned by Facebook, a company with countless complaints about privacy violations?
WhatsApp, Signal, or Telegram?
WhatsApp, Signal, and Telegram are three of the most popular encrypted messaging apps out there. Here’s an excellent review comparing the relative security of each. It came out in July, 2020, before this latest kerfuffle.
Spoiler: In the above review, Signal comes out clearly on top.
We received an unusual gift last month. It came in a densely packed medium-sized box. It was a grow-your-own-mushroom kit. I had seen these at a farmers market a couple months back and was intrigued. Ours came from NearbyNaturalsFL.com and contained a Blue Oyster Grow Kit.
Basically, you leave everything in the box, open the top, make a small X incision in the top plastic, create a simple humidity tent with plastic (included) and mist it a couple times a day.
It took several days before we saw the first growth of baby mushrooms, called “pins.”
6pm, January 1
After the pins formed, we removed the tent and misted more frequently. I could not believe how fast the mushrooms grew!
10pm Jan 1 (4 hrs later)
8am, Jan 2 (10 hrs later)
Midnight, Jan 3 (4 hrs later)
9am, Jan 3 (9 hrs later)
7pm, Jan 3 (10 hrs later)
6am, Jan 4 (11 hrs later)
The photos above show the growth spanning all of 3 days! We likely will harvest them today.
A new cycle of pins and mushroom growth should follow soon after this first harvest.
Next time, after the pinning and tent removal, I’m going to set up my GoPro camera for time-lapse photography. I just cannot believe how darn fast these guys can grow!
My two concerns going into this were unfounded:
Smell – there is none whatsoever. The substrate containing the mycelium (thread-like colony, kind of like mushroom roots) has no manure, pesticides, “or anything nasty.”
Mess – there is none. Everything is contained within the box and the tight plastic bag except for the mushrooms that grow out of the incision in the bag. There is no dirt or debris to clean up. We placed the grow box on our kitchen counter and have zero issues.
I’m very impressed with this kit and cannot wait to taste our first harvest.
There are several companies out there offering DIY mushroom grow kits like this. If you like mushrooms, I recommend you check ’em out!
I love singing karaoke, but due to the pandemic I have avoided singing in public. Instead, I have been hosting karaoke parties online. I have hosted over 40 50 so far.
I’ve been hosting online karaoke parties every few weeks since May, 2020. The story has been picked up by local TV stations and bloggers. I keep updating this post as new stories get posted.
1. KOIN AM Extra – Local musician shares how to host an online karaoke party. – Published December 31, 2020.
(MMOTIRT = Making Music Online Together In Real Time)
tl;dr: Getting a wired connection is simpler than many think
The most common obstacle to online real-time musical collaboration is the requirement of a wired network connection. Many assume that is a show-stopper – but it likely isn’t.
I wrote briefly about the need for a wired network connection in Step 1 – Tech Requirements to minimize latency. In this installment I will expand on and clarify this particular requirement and how to meet it.
Most internet-enabled devices in your home (laptops, tablets, TV streaming devices, etc.) probably use Wi-Fi. If you have a computer with a wired connection, often it may be a single desktop computer close to your network modem or router.
But if you have high-speed internet in your home, chances are good you can set up a wired network connection with minimal work and low cost.
You will need:
A free Ethernet port on your router or modem
A long enough Ethernet cable
An Ethernet port on the computer you wish to use
If you have high-speed internet, somewhere in your home you have a modem and/or router – sometimes this is one unified device, sometimes they are two separate devices.
If you use Wi-Fi in your home, look for the device with the antenna or antennas attached to it. Look on the back, and you should see one or more Ethernet ports. They look like oversize telephone cord ports. In the example below, you can see four unused ports labeled “Ethernet.” Note, too, that each port has two LED indicators (yellow and green).
Ethernet ports on the back of a network router
This is where you will attach one end of your Ethernet cable to. The other end will connect to your computer.
Most desktop computers have an Ethernet port on the back of them. Larger, older, and/or more powerful laptops might have a single Ethernet port, either on the back or one of the sides. It will also have two indicator lights, just like those on your router/modem above.
If you have a laptop and a docking station, many docking stations have a built-in Ethernet port.
But what if your laptop has no Ethernet port (e.g. my Mac PowerBook has none)? You can purchase an Ethernet adapter. For my Mac PowerBook, I purchased a Thunderbolt 3 (aka USB-C) to Ethernet LAN adapter for just US$15. Check your laptop to see what kind of adapter you can use (USB-C, USB 2.0, etc.).
USB-C to Ethernet adapter
Finally, you need an Ethernet cable sufficiently long to run from your modem/router to the computer you want to use for online real-time musical collaboration. Ethernet cables usually are usually 6 feet (two meters) long, but can come in much longer lengths up to and exceeding 100 feet (30 meters). Even the longest cables can be obtained for under US$30.
CAT 5 Ethernet cable
When shopping for Ethernet cables, you may see names like “Cat 5,” “Cat 5e,” “Cat 6,” “Cat 6a,” “Cat 7,” and beyond. Although these categories vary in potential data speed, Cat 5 should do you just fine. It is unlikely your home internet speeds go beyond the need for Cat 5. Cat 5 will be the cheapest, and usually more flexible than the higher rated cables.
A. Test your speed beforehand
It’s a good idea to see what your speed and latency is before you connect your Ethernet cable. To test your download and upload speeds, point your browser to either of these two websites: https://www.speedtest.net/ – just click “GO” https://www.speakeasy.net/speedtest/ – just click “Start Test”
Both of these sites will run a test for about a minute or so and will report your Upload and Download speeds. I recommend you write these down. For example, a friend I helped started out with a download speed of 30 MBPS and an upload speed of 10.9 MBPS.
Now connect your Ethernet cable. Make sure it is firmly inserted into your modem/router, and into your computer, or Ethernet adapter at the computer end. The cable should lock; you might hear a click or “snap” sound when it does.
Although it may be hard to see, look carefully at the Ethernet ports into which you have inserted your cable. If everything is turned on, you should see one or both of the lights illuminated or flashing at both the modem/router end and the computer end. If not, make sure your cable is firmly connected, or unplug and replug it in (use a different port if you have that option).
Ethernet adapter. Note the illuminated green LED. I could not catch the yellow LED illuminated – it flashed intermittently.
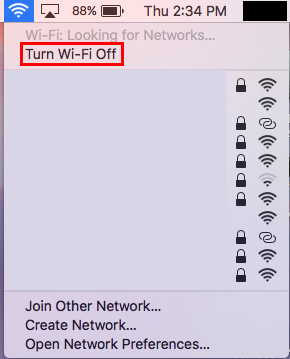
C. Turn off Wi-Fi on your computer
You want to ensure your computer is using Ethernet, so you will need to disable Wi-Fi. On a Mac, locate the Wi-Fi icon on your title bar and select Turn-Wi-Fi Off (or in the new Big Sur macOS release, flip the Wi-Fi switch off).
On a Windows computer, there are several ways to turn off Wi-Fi. One way is to locate the the Network control panel and disable Wi-Fi there:
Once you have disabled Wi-Fi, see if you can surf the web. If you are unable to surf the web, double-check your Ethernet connection and/or try rebooting your computer.
D. Testing your Ethernet Connection
Once you have verified your Ethernet connection is working, repeat the network speed test I described above and note your download and upload speeds. You may see a significant increase in one or both numbers (in this case, bigger is better).
Try testing your latency in Jamkazam again. You should see marked reductions in latency (lower is better).
Latency in this example is 13.9ms
Assuming you have yellow (medium: 10-20 ms) or green (good: 0-10 ms) latency numbers in Jamkazam, you are ready to go! Connect and jam with your friends.
When you are done with your Jamkazam session, you can disconnect and coil up the Ethernet cable and re-enable Wi-Fi on your computer.
Optional: A Permanent Wired Solution
If you want to enjoy a wired Ethernet connection permanently, an Ethernet port can be installed. If you are handy (or know someone who is), Ethernet cable can be “fished” through walls, under floors, and above ceilings so a permanent Ethernet port can be installed in a convenient location. One will need to be installed near your modem/router, and the other near your computer.
There are many YouTube videos (here is one example), books, and web pages that explain how to do this. An electrician can do this as well as someone you might know who works in IT or Telecomm.